2017 Subaru Outback 2.5i - Serpentine Belt Replacement

The belt was squealing on cold/damp mornings. Since I had never replaced it and I am almost at 90k it seemed like a simple thing to tackle. It wasn’t on the dealer’s list. I vaguely remember them mentioning it a while back during an oil change service but I blew it off (because it hadn’t started squealing and I’m sure they quoted me $350).
This is one of the easiest things you can replace. It’s a $30 belt, and to get it off, you just need a 15mm wrench/socket to move the tensioner to put slack on the belt. Then it’s just a matter of routing the belt properly.
There is a little plastic shroud at the top of the engine that covers it. A 10mm wrench removes the single bolt holding it on. The opposing side is just a little push-in plastic piece that pops out when you give it a tug.
The hardest part about this is finding a belt diagram worth a shit on the internet. I never found a diagram under my hood, and there are a ton of diagrams, but only a handful actually match the 2017 2.5L Outback.
Tools and Supplies
| Item | Notes |
|---|---|
| OEM serpentine belt | PN:23780AA140 Check routing diagram before ordering |
| Belt routing diagram | Under hood or in manual |
| 15mm wrench / socket | For tensioner |
| Breaker bar | Not strictly needed, but a long handle makes it easy to manipulate the tensioner |
Specs
| Belt part # | 23780AA140 |
| Belt name | 2015-2019 Subaru Serpentine Belt |
| Price | $38.81 |
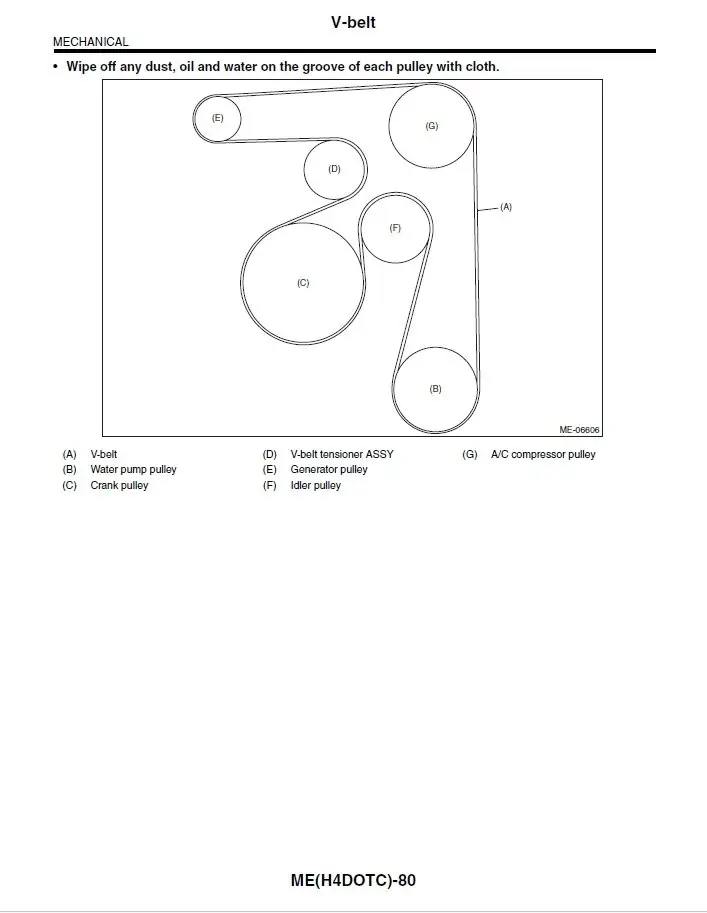
Belt Routing Diagram
This is the belt routing diagram that matched my 2017 2.5L Outback Limited
I’d recommend take a picture of your car’s belt before you get started just in case. Thats what I did and it came in handy when I immediately forgot how it was routed. Here is the pic I took of the belt before I got started:

Replacing the belt
Pic of the shroud with the single bolt you need to remove:

You can see how old my belt is by the look of it:

Make sure the grooves fit in the grooved pulleys properly. Make sure nothing is rubbing on anything, that the grooved pulleys are mating well with the grooved part of the belt, and that the smooth portions are around the smooth tensioner and idler pulleys.
I started it up without the shroud on just to check and listen for anything. I shut it off and reinspected. If everything looks good (mine did), then put the shroud back on and call it good!
Another tip I read online: throw your old belt in the back with your spare tire just in case, assuming it’s not completely trashed. It’s better to have a backup in a pinch, and if you’ve completely screwed up this belt change, you might need it sooner rather than later!